
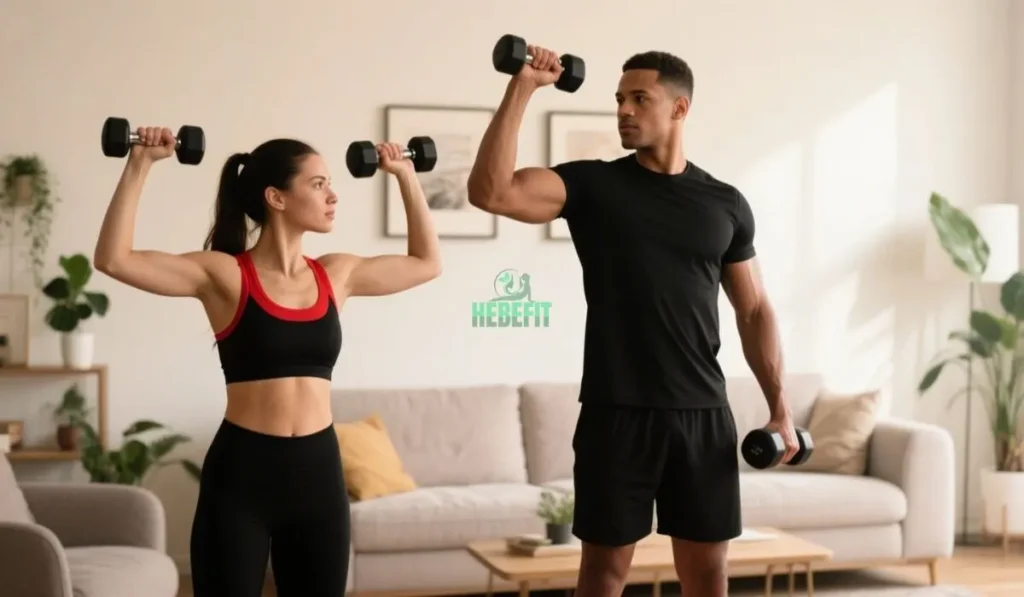
Welcome to your ultimate guide to the best forearm workouts at home! Are you looking to build serious grip strength, enhance your lifting performance or simply sculpt more defined and powerful forearms without needing a gym membership? You’re in the right place! Many people overlook these crucial muscles, but developing them is key to overall strength and daily function. This article will explore the best forearm workouts at home, why they’re essential, and how you can easily incorporate them into your routine for noticeable results. Get ready to unlock a new level of power, right from the comfort of your living room with the best forearm workouts at home!
Why Bother with the Best Forearm Workouts at Home? Unlocking a Surprising Range of Benefits!
You might be wondering, “Why all the fuss about forearm workouts, especially the best forearm workouts at home?” It’s a valid question! Often overshadowed by biceps and triceps, your forearms are unsung heroes in your fitness journey and daily life. Neglecting them is like building a powerful engine but fitting it with bicycle tires – you’re limiting your potential!
The Foundation of Grip Strength
Think about it: almost every upper body exercise, from pull-ups to deadlifts and even carrying groceries, relies heavily on your grip. Stronger forearms directly translate to a stronger grip. This means you can:
- Lift heavier weights in other exercises.
- Perform more repetitions.
- Maintain better control during complex movements.
- Reduce the likelihood of your grip failing before your target muscles do.
This is paramount for anyone serious about making progress in their strength training, making the pursuit of the best forearm workouts at home a worthy goal.
Enhancing Performance in Sports & Daily Activities
Beyond the gym, powerful forearms are invaluable:
- Sports: Think tennis, rock climbing, golf, martial arts, baseball – any sport involving gripping, swinging, or throwing benefits immensely from strong forearms.
- Daily Tasks: Opening stubborn jars, carrying heavy bags, DIY projects, or even prolonged typing can be less strenuous with well-conditioned forearms.
Injury Prevention – A Stitch in Time
Weak forearms and wrists are more susceptible to strains, sprains, and conditions like tendonitis. By regularly engaging in the best forearm workouts at home, you strengthen the muscles, tendons, and ligaments around your wrists and elbows, creating more resilient joints. This is especially important for beginners who might be new to the stresses of exercise.
Aesthetic Appeal – Completing the Look
Let’s be honest, well-developed forearms contribute significantly to a balanced and aesthetically pleasing physique. They signal strength and capability, adding a look of completeness to your arms. While aesthetics might not be the primary driver for everyone, it’s certainly a welcome bonus of consistent forearm training.
Understanding these benefits makes it clear why dedicating time to the best forearm workouts at home is not just an option, but a crucial component of a well-rounded fitness regimen, particularly for beginners aiming to build a solid foundation.
The Top 10+ Best Forearm Workouts You Can Do at Home (Step-by-Step Guide)
Ready to get to work? Here are some of the best forearm workouts at home, requiring minimal to no equipment. We’ll break down each exercise step-by-step, making it easy for beginners to follow along and get started safely and effectively.
Remember to warm up your wrists and forearms with some gentle rotations and stretches before you begin.
1. Dumbbell Wrist Curls (Palms Up) – The Classic Builder
- Targets: Forearm flexors (inner forearm).
- Equipment: Light to moderate dumbbells (or water bottles, canned goods).
- Why it’s one of the best: This is a foundational exercise for building mass and strength in the main part of your forearm.
- Step 1: Position Yourself: Sit on a bench or chair, or kneel on the floor. Rest your forearms on your thighs or a flat bench, with your palms facing upwards and your wrists hanging off the edge.
- Step 2: The Grip: Hold a dumbbell in each hand with an underhand grip (palms up).
- Step 3: The Curl: Slowly lower the dumbbells as far as comfortably possible, allowing your wrists to extend fully.
- Step 4: The Squeeze: Curl the dumbbells upwards, flexing your wrists and squeezing your forearm muscles at the top of the movement. Focus on isolating the movement to your wrists, avoiding any help from your biceps.
- Step 5: Repeat: Lower slowly and repeat for the desired number of repetitions.
- Pro Tip for Beginners: Start with very light weights to master the form. You’ll be surprised how quickly your forearms fatigue!
2. Dumbbell Reverse Wrist Curls (Palms Down) – Hitting the Extensors
- Targets: Forearm extensors (top of the forearm).
- Equipment: Light to moderate dumbbells.
- Why it’s one of the best: Essential for balanced forearm development and strengthening the often-neglected top part of your forearms.
- Step 1: Position Yourself: Similar to wrist curls, sit with your forearms resting on your thighs or a bench, but this time with your palms facing downwards.
- Step 2: The Grip: Hold a dumbbell in each hand with an overhand grip (palms down).
- Step 3: The Extension: Slowly lower the dumbbells, allowing your wrists to flex downwards.
- Step 4: The Lift: Extend your wrists upwards, lifting the dumbbells as high as you can, feeling the contraction in the top of your forearms.
- Step 5: Repeat: Lower under control and repeat.
- HebeFit Tip: You’ll likely need to use lighter weights for reverse wrist curls compared to regular wrist curls.
3. Farmer’s Walks – Functional Grip Powerhouse
- Targets: Grip strength, forearm endurance, traps, core.
- Equipment: Heavy dumbbells, kettlebells, water jugs, loaded grocery bags.
- Why it’s one of the best: A highly functional exercise that builds incredible crushing and supporting grip strength, crucial for real-world power.
- Step 1: The Setup: Stand with a heavy weight in each hand, arms by your sides, palms facing your body.
- Step 2: The Stance: Keep your chest up, shoulders back and down, and core engaged.
- Step 3: The Walk: Walk forward for a set distance or time, maintaining good posture and a tight grip. Imagine you’re trying to crush the handles.
- Step 4: The Turn (Optional): If space is limited, carefully turn around and walk back.
- Step 5: Rest and Repeat: Safely lower the weights, rest, and repeat.
- At-Home Adaptation: No heavy dumbbells? Use two sturdy reusable grocery bags filled with books, cans, or water bottles.
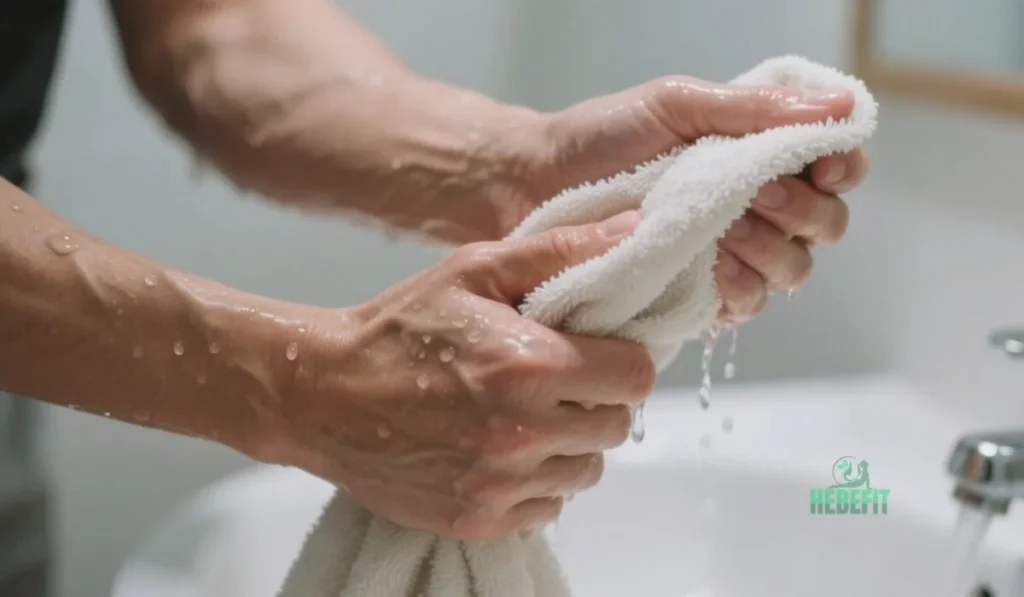
4. Towel Wring-Outs – Simple Yet Deceptive
- Targets: Wrist flexors, extensors, and rotators; overall grip.
- Equipment: A sturdy hand towel.
- Why it’s one of the best: An incredibly accessible and surprisingly effective exercise for forearm endurance and strength.
- Step 1: The Grip: Hold a towel with both hands, about shoulder-width apart.
- Step 2: The Twist: Twist the towel by wringing it out, as if you’re trying to squeeze every last drop of water from it. One hand will be flexing while the other is extending.
- Step 3: Hold and Reverse: Hold the tension for a few seconds, then slowly reverse the twist in the opposite direction.
- Step 4: Repeat: Continue twisting back and forth for a set time or number of repetitions.
- Feel the Burn: This one creeps up on you! Focus on a continuous, strong wringing motion.
5. Wrist Rotations (Pronation & Supination)
- Targets: Forearm rotators (pronator and supinator muscles).
- Equipment: Light dumbbell, hammer, or even a water bottle held by one end.
- Why it’s one of the best: Improves wrist mobility and strengthens the muscles responsible for turning your palm up and down.
- Step 1: The Hold: Sit or stand, holding a light dumbbell by one end (the weighted end). Your elbow should be bent at 90 degrees and can be rested on a table or your thigh for stability. Start with your palm facing up (supination) or down (pronation).
- Step 2: The Rotation: Slowly rotate your forearm so your palm turns from facing up to facing down (pronation), or from facing down to facing up (supination). Control the movement throughout.
- Step 3: Full Range: Go through the fullest comfortable range of motion.
- Step 4: Repeat: Perform for desired reps, then switch hands.
- Beginner Note: If using a hammer, hold it closer to the head for less resistance, and further down the handle for more.
6. Finger Curls (Plate Pinch or Book Pinch Curls)
- Targets: Finger flexors, intrinsic hand muscles, pinch grip.
- Equipment: Small weight plate, thick book.
- Why it’s one of the best: Directly targets the muscles responsible for closing your hand and pinching, often a weak link in overall grip strength.
- Step 1: The Pinch: Sit with your forearm resting on your thigh, palm up. Hold a weight plate or a thick book by pinching it with your fingertips and thumb.
- Step 2: The Curl: Allow the plate/book to roll down towards your fingertips, then curl your fingers to bring it back up into your palm.
- Step 3: Control: Focus on a smooth, controlled movement driven by your fingers.
- Step 4: Repeat: Continue for reps.
- Challenge Yourself: Try to use only your fingertips for an added challenge to your pinch grip.
7. Dead Hangs (If you have a pull-up bar)
- Targets: Grip endurance, latissimus dorsi, shoulders, core.
- Equipment: Pull-up bar, sturdy tree branch, playground monkey bars.
- Why it’s one of the best: A fantastic isometric exercise for building serious supporting grip strength and decompressing the spine.
- Step 1: The Grip: Reach up and grab the pull-up bar with an overhand grip, slightly wider than shoulder-width.
- Step 2: The Hang: Let your body hang freely, keeping your arms straight but engaging your shoulders (don’t let them sag up to your ears – keep them “packed”).
- Step 3: Hold: Hold for as long as you can maintain good form and grip.
- Step 4: Release and Repeat: Carefully release, rest, and repeat for sets.
- Tip: You can vary your grip (pronated, supinated, neutral) to target muscles slightly differently.
8. Towel Pull-Up Hangs / Rows (Variation for increased grip demand)
- Targets: Intense grip focus, back muscles.
- Equipment: Pull-up bar and two small towels.
- Why it’s one of the best: Dramatically increases the difficulty of hangs or rows by forcing your hands and forearms to work much harder to maintain grip on the towels.
- Step 1: Setup: Loop two towels over a pull-up bar.
- Step 2: Grip: Grab one towel in each hand.
- Step 3: Hang or Row: Perform dead hangs as described above, or if you’re more advanced, try performing pull-ups or inverted rows holding the towels.
- Warning: This is an advanced grip challenge. Build up to it.
9. Bucket Rice Grabs/Twists
- Targets: All muscles of the hands and forearms, extensors, flexors, rotators.
- Equipment: A bucket and a large bag of uncooked rice.
- Why it’s one of the best: Offers 360-degree resistance and is excellent for developing both strength and endurance in the smaller muscles.
- Step 1: The Plunge: Plunge your hand deep into the bucket of rice.
- Step 2: Actions:
- Grab and Squeeze: Make a fist and squeeze the rice tightly.
- Open Hand: Extend your fingers and spread them wide against the resistance of the rice.
- Wrist Flexion/Extension: With your hand in the rice, flex and extend your wrist.
- Rotations: Make circular motions with your wrist, like stirring.
- Step 3: Duration: Perform each action for 30-60 seconds, then switch hands.
- Unique Feel: This provides a unique and comprehensive workout for your lower arms.
10. Resistance Band Wrist Curls/Reverse Curls
- Targets: Forearm flexors and extensors.
- Equipment: Resistance band.
- Why it’s one of the best: Portable, versatile, and provides accommodating resistance (gets harder as you stretch it).
- Step 1: Anchor or Hold:
- For Curls (Palms Up): Stand on the middle of the band with one foot, hold the ends with palms up. Or, sit and loop the band under your feet.
- For Reverse Curls (Palms Down): Same setup, but grip with palms down.
- Step 2: Position: Rest your forearms on your thighs (if sitting) or keep a slight bend in your elbows (if standing).
- Step 3: The Movement: Perform wrist curls or reverse wrist curls as described with dumbbells, working against the band’s resistance.
- Step 4: Control: Ensure a controlled movement, especially on the eccentric (lowering) phase.
- Step 1: Anchor or Hold:
Sample Beginner Forearm Workout Schedule (At Home)
| Day | Focus | Exercises (Choose 2-3) | Sets & Reps | Rest Between Sets |
| Day 1 | Flexor & Grip Focus | Dumbbell Wrist Curls, Farmer’s Walks, Finger Curls | 3 sets of 10-15 reps* | 60-90 seconds |
| Day 2 | Rest / Active Recovery | Gentle wrist stretches | N/A | N/A |
| Day 3 | Extensor & Rotation Focus | Dumbbell Reverse Wrist Curls, Wrist Rotations, Towel Wrings | 3 sets of 12-20 reps* | 60-90 seconds |
| Day 4 | Rest / Active Recovery | Gentle wrist stretches | N/A | N/A |
| Day 5 | Full Forearm & Endurance | Dead Hangs (or Towel Hangs), Bucket Rice Grabs | 2-3 sets to failure/time | 90-120 seconds |
| Day 6 & 7 | Rest |
*For Farmer’s Walks and Dead Hangs, aim for time (e.g., 3 sets of 30-60 second holds/walks). For Towel Wrings and Rice Grabs, aim for 30-60 seconds per set. Listen to your body and adjust as needed.

What are the Benefits of Step-by-Step Best Forearm Workouts at Home? (Beyond the Obvious)
We’ve touched on why forearms are important, but let’s dive deeper into the specific, tangible benefits you’ll reap by consistently performing these step-by-step best forearm workouts at home.
Skyrocketed Grip Strength
This is the most direct benefit.
- Crushing Grip: The ability to squeeze things tightly (think handshakes, gripping tools). Exercises like Towel Wrings and Finger Curls excel here.
- Supporting Grip: The ability to hold onto heavy objects for extended periods (Farmer’s Walks, Dead Hangs).
- Pinch Grip: Strength between your thumb and fingers (Finger Curls, Plate Pinches).
A stronger grip means you’re no longer limited by it in other lifts like deadlifts, rows, or pull-ups, allowing the target muscles of those exercises to work harder and grow more.
Enhanced Performance in Compound Lifts & Sports
Many individuals find their progress in major lifts stalls because their grip gives out first. By strengthening your forearms:
- You can hold heavier barbells and dumbbells for more reps.
- Your form is less likely to break down due to a failing grip.
- Sports requiring rackets, bats, clubs, or climbing will see direct performance improvements. Imagine the added power in your tennis serve or the endurance on a rock wall.
Reduced Risk of Wrist and Elbow Injuries
Stronger forearm muscles act as better shock absorbers and stabilizers for your wrist and elbow joints. This can help prevent common ailments such as:
- Tennis Elbow (Lateral Epicondylitis)
- Golfer’s Elbow (Medial Epicondylitis)
- Wrist sprains and strains
- Carpal Tunnel Syndrome (by improving muscle balance and support)
This is particularly crucial for those in the USA who might engage in repetitive tasks at work or hobbies that strain these areas.
Improved Muscular Endurance in Forearms
Many of the best forearm workouts at home, especially higher-repetition exercises or isometric holds, build muscular endurance. This means your forearms can work for longer periods before fatiguing, beneficial for:
- Prolonged writing or typing.
- Carrying items for extended durations.
- Endurance-based sports.
Noticeable Aesthetic Improvement
While function is key, there’s no denying the confidence boost that comes from well-defined forearms. They contribute to a more balanced and powerful-looking physique, complementing upper arm development. For many, this visual progress is a great motivator.
Increased Bone Density in Wrists and Forearms
Weight-bearing exercises, even with light weights as used in some forearm exercises, can contribute to increased bone density over time. This is a long-term health benefit, reducing the risk of fractures.
By following the step-by-step guides for the best forearm workouts at home, you’re not just building muscle; you’re investing in your overall capability, health, and athletic potential.
Forearm Exercise Quick Guide: Muscles & Equipment
| Exercise | Primary Muscle Group(s) Targeted | Equipment Needed (At Home) | Beginner Friendly? |
| Dumbbell Wrist Curls | Forearm Flexors | Dumbbells, water bottles, cans | Yes |
| Dumbbell Reverse Wrist Curls | Forearm Extensors | Dumbbells, water bottles, cans | Yes |
| Farmer’s Walks | Overall Grip, Forearm Endurance | Heavy Dumbbells, water jugs, loaded bags | Yes (adjust weight) |
| Towel Wring-Outs | Flexors, Extensors, Rotators | Hand Towel | Yes |
| Wrist Rotations | Pronators, Supinators | Light Dumbbell, hammer, water bottle | Yes |
| Finger Curls | Finger Flexors, Pinch Grip | Small Plate, Thick Book | Yes |
| Dead Hangs | Grip Endurance, Lats | Pull-up Bar (or alternative) | Moderate |
| Towel Pull-Up Hangs | Intense Grip, Back | Pull-up Bar, 2 Towels | Advanced |
| Bucket Rice Grabs | All Hand/Forearm Muscles | Bucket, Rice | Yes |
| Resistance Band Wrist Curls | Forearm Flexors/Extensors | Resistance Band | Yes |
Crafting Your Perfect At-Home Forearm Routine
Now that you know the best forearm workouts at home and their benefits, how do you put it all together?
Frequency: How Often Should You Train Forearms?
Forearms are relatively small muscle groups and can recover fairly quickly. However, they are also used in many other exercises.
- For beginners: Start with 2-3 dedicated forearm sessions per week, on non-consecutive days.
- Listen to your body: If your forearms are sore from other workouts (like a heavy back day), you might want to skip a dedicated forearm session or go lighter.
Sets and Reps: Finding the Sweet Spot
This depends on your goals:
- For Strength & Hypertrophy (Size): Aim for 3-4 sets of 8-15 repetitions. For exercises like Farmer’s Walks or Dead Hangs, aim for 3-4 sets of holds for 20-60 seconds.
- For Endurance: Aim for 2-3 sets of 15-25+ repetitions, or timed sets (e.g., Towel Wrings for 60 seconds).
- Progressive Overload is Key: To keep making progress, you need to gradually challenge your muscles more over time. This can mean:
- Increasing the weight/resistance.
- Increasing the repetitions or hold times.
- Increasing the sets.
- Decreasing rest times (use cautiously).
Exercise Selection and Variation
- Balance is important: Ensure you’re working both your forearm flexors (e.g., wrist curls) and extensors (e.g., reverse wrist curls), as well as your grip (e.g., Farmer’s Walks).
- Mix it up: You don’t need to do all 10+ exercises in every workout! Pick 3-4 exercises per session, focusing on different aspects of forearm strength.
- Example Beginner Routine (as per Table 1):
- Workout A: Dumbbell Wrist Curls, Farmer’s Walks, Finger Curls.
- Workout B: Dumbbell Reverse Wrist Curls, Wrist Rotations, Towel Wrings.
Integrating with Your Existing Workouts
You can either have dedicated forearm days or tack forearm exercises onto the end of other workouts:
- After Upper Body Days: Your grip might already be fatigued, so this can be a good burnout.
- After Lower Body Days: Your grip will be fresh, allowing you to focus maximum effort on forearms.
- Dedicated Short Sessions: A quick 10-15 minute forearm blast can be very effective.
Forearm Workout Progression Strategies
| Strategy | How to Implement | When to Use | Notes |
| Increase Weight/Resistance | Add small increments of weight to dumbbells, use a thicker band, add more items to bags. | When you can comfortably complete all reps/sets with good form. | The most common and effective method for strength/hypertrophy. |
| Increase Reps/Duration | Aim for 1-2 more reps per set, or hold an isometric exercise for 5-10 seconds longer. | When increasing weight isn’t feasible or you’re focusing on endurance. | Good for breaking plateaus or when equipment is limited. |
| Increase Sets | Add an extra set to one or more exercises. | Once you’ve adapted to the current volume. | Increases total work volume. Use judiciously to avoid overtraining. |
| Decrease Rest Time | Reduce rest between sets by 5-15 seconds. | To increase workout intensity and metabolic stress. | Can make workouts more challenging; ensure form doesn’t suffer. |
| Improve Form/Tempo | Focus on slower eccentrics (lowering phase), pause at peak contraction. | Continuously. Good form is paramount. | Enhances muscle activation and time under tension. |
| Exercise Variation | Switch to a more challenging exercise or a variation of a current one. | To prevent plateaus and keep workouts engaging. | E.g., from regular Dead Hangs to Towel Hangs. |
Tips for Success and Avoiding Injury with Your Home Forearm Workouts
Maximizing results from the best forearm workouts at home while staying injury-free is crucial.
Warm-Up Properly
- Don’t skip this! Gentle wrist circles (clockwise and counter-clockwise), finger flexions/extensions, and light arm swings can prepare your muscles and joints. A few minutes is all it takes.
Start Light and Focus on Form
- Especially for beginners, mastering the correct movement pattern is more important than lifting heavy. Poor form can lead to wrist strain or ineffective workouts.
- You should feel the target muscles working. If you don’t, reassess your technique.
Control the Movement (No Ego Lifting!)
- Avoid jerky, fast movements. Use a controlled tempo, especially on the eccentric (lowering) phase of the exercise. This increases time under tension and reduces injury risk.
H3: Listen to Your Body
- Pain is a signal. Differentiate between muscle fatigue/burn (good) and sharp joint pain (bad). If you feel sharp pain, stop the exercise and assess.
- Don’t push through pain, as it can lead to chronic issues.
Don’t Forget to Stretch
- After your workout, gentle forearm stretches can aid recovery and maintain flexibility.
- Wrist Flexor Stretch: Extend one arm in front, palm up. Gently bend your wrist down with your other hand, feeling a stretch in the inner forearm.
- Wrist Extensor Stretch: Extend one arm in front, palm down. Gently bend your wrist down with your other hand, feeling a stretch on top of your forearm.
- Hold each stretch for 20-30 seconds.
Consistency is King
- Sporadic workouts won’t yield significant results. Aim for consistency with your chosen routine (e.g., 2-3 times per week). Small, consistent efforts compound over time.
Stay Hydrated and Nourished
- Like any muscle, your forearms need proper hydration and nutrients (especially protein) to recover and grow. Support your training with a balanced diet. If you’re looking for more dietary tips, explore other articles on HebeFit!
By keeping these tips in mind, you’ll be well on your way to building impressive forearm strength and size safely and effectively.
Final Thoughts: Unleash Your Grip Potential!
Embarking on a journey to strengthen your forearms using the best forearm workouts at home is a smart investment in your overall fitness, daily capabilities, and even your physique. As you’ve seen, you don’t need a fancy gym or complex equipment to make significant progress. Simple, consistent effort with exercises like wrist curls, farmer’s walks, and towel wrings can unlock a new level of grip strength and muscular development.
Remember, patience and consistency are your greatest allies. Start slowly, focus on impeccable form, and gradually increase the challenge. Listen to your body, celebrate small victories, and enjoy the process of building stronger, more capable forearms.
We hope this guide has empowered you with the knowledge and tools to confidently tackle your forearm training. For more fitness tips, workout routines, and nutritional advice tailored for your goals, be sure to explore other articles here on HebeFit. We’re here to support you every step of your fitness journey! Now, go get a grip!
FAQs: Your Questions on Best Forearm Workouts at Home Answered
Here are some frequently asked questions about developing your forearms at home:
How long does it take to see results from forearm workouts at home?
With consistent training (2-3 times per week) and proper nutrition, you might start noticing an increase in grip strength and forearm endurance within 4-6 weeks. Visible muscle growth (hypertrophy) may take a bit longer, typically 6-12 weeks, depending on individual factors like genetics, diet, and workout intensity.
Can I train forearms every day at home?
It’s generally not recommended to train forearms intensely every day. Like any other muscle group, they need time to recover and rebuild. Overtraining can lead to injury or hinder progress. Aim for 2-3 dedicated forearm workouts per week, allowing at least one day of rest in between for these specific muscles.
What if I don’t have dumbbells for my home forearm workouts?
No dumbbells? No problem! Many of the best forearm workouts at home require no traditional equipment. You can use household items like water bottles, canned goods, heavy books, loaded grocery bags (for Farmer’s Walks), or a sturdy towel (for Towel Wrings). Resistance bands are also a great, affordable option. Exercises like Bucket Rice Grabs use rice for resistance.
Are forearm workouts at home effective for building mass?
Yes, absolutely! Forearm workouts at home can be very effective for building mass (hypertrophy) provided you apply the principle of progressive overload. This means consistently challenging your muscles by increasing weight/resistance, reps, or sets over time. A good diet rich in protein will also support muscle growth.
Will forearm workouts make my wrists thicker?
Forearm workouts primarily build the muscles in your forearms, which are located between your wrist and elbow. While the circumference of your forearm will increase, the actual bone structure of your wrist joint won’t change. However, stronger, more developed forearm muscles can give the appearance of thicker, more substantial wrists.
Do I need to warm up before doing forearm exercises?
Yes, warming up is highly recommended. A brief warm-up consisting of light cardio (like arm circles) and dynamic wrist stretches (like wrist rotations and flexions/extensions without weight) prepares your muscles and joints for the workout, increasing blood flow and reducing the risk of injury.
Can women benefit from the best forearm workouts at home too?
Definitely! Strong forearms are beneficial for everyone, regardless of gender. Women can gain significant advantages in grip strength for daily tasks, improved performance in sports and other exercises (like yoga or lifting), and enhanced muscle tone. The exercises are the same; intensity and weight can be adjusted to individual strength levels.
My grip is weak. Where should I start with home forearm workouts?
If your grip is a weak point, start with foundational exercises that build overall grip and forearm strength. Good starting points include: Dumbbell Wrist Curls and Reverse Wrist Curls (with very light weight or even no weight initially to master form), Towel Wring-Outs, and short-duration Farmer’s Walks with light objects. Focus on consistency and proper technique before increasing intensity.
What are some signs I might be overtraining my forearms?
Signs of overtraining forearms can include persistent soreness that doesn’t resolve with rest, pain in the wrists or elbows, a noticeable decrease in grip strength or performance, and general fatigue in the forearms even during light activities. If you experience these, take a few extra rest days and consider reducing your training volume or intensity when you resume.